H3 · 1 Setup · 2 Validation · 3 Operations
Guide 3: Operations
Running your first exercise, and every one after it.
Download the PDF A4, with a title page and contents
If the reader above does not load, open the PDF directly.
Read it as a web page instead
Running your first exercise, and every one after it.
Setup got H3 working. Validation established that its output can be defended. This guide is the work itself.
You finish with two packages, and H3 exists to build them.
A workforce development package: which professional roles the exercise actually exercised, measured against a published framework, with the uncovered list named rather than hidden, and the evidence a human assessor needs.
A tooling package: the synthetic analyst data the exercise runs on, and a clear deployment guide for each tool that data targets, so a recipient stands up the real Maltego and MISP and loads the data, all derived from one enumeration so they describe the same system. It is deployment guidance a team acts on, not a folder of stub containers that emulate nothing.
Every step below builds one or the other. If a step is not feeding a package, it does not belong in the day.
Three of the window's five tabs are the exercise, in order
Open H3 and you get five tabs. Three of them are the lifecycle of one exercise, in order, and this guide follows those three:
- Process is planning, a month out. The plan checklist, a maturity
self-assessment scored 1 to 5 against each part of the process, and the after-action report that compiles at the end.
- Exercise is the build, a seven-step wizard. It must be finished at least
24 hours before the event, ending with the analyst data imported into the tools.
- Run is the day itself. Validate every seat, work the eight-hour
schedule, and capture what to improve as you go.
The other two are there when you need them and are not part of the lifecycle. AI WorkBench lets you ask the twelve bundled frameworks a question in plain English, and is also where you author a new scenario. It is optional and it is an experiment: nothing in the lifecycle needs it, and "The AI WorkBench, which is optional" near the end of this guide explains both what it does and what has and has not been validated about it. Platform shows every agent H3 breaks into and whether it runs on this machine right now.
The sections below map onto the three lifecycle tabs in that order.
Plan for a full eight-hour day for the exercise itself, and start the preparation weeks ahead. The day runs badly when the preparation is rushed: the most common failure is not a technical one on the day, it is a participant who was invited late, a laptop that could not run Maltego or reach a MISP instance, or a role nobody confirmed. The schedule and the preparation timeline below exist to prevent exactly that.
Phase 1, the Process tab: plan it, a month out
Everything in this section is the Process tab's work, and the tab holds a checklist for it so nothing is carried in somebody's head.
Score your maturity before you build anything. The Process tab asks you to rate each part of the process from 1 to 5 and rolls the ratings into an overall figure. Do it honestly and early: it tells you which parts of the day need the most support, and repeating it after the exercise is how you show movement.
Preparation: three to four weeks before the event
An exercise is a scheduled event with people, hardware and access, and it is organised like one. Do this work early; none of it can be done well on the morning of.
Decide who takes part, and who does what. You need, at minimum:
- A coordinator. One named person who scopes the package and owns the day.
- Participants, the people the exercise develops. Plan the number and the
mix now, because it drives the room, the licences and the schedule.
- A white team of one or two who hold the answer key and inject events, and
who do not participate as analysts.
- A decision authority, the person who can authorise a containment action
with real operational consequence. Under NIS2 the first report is due within twenty four hours, and that clock is met or missed by whether this person is reachable and briefed, so they are invited, not assumed.
Invite, notify, and get it in writing. Send the invitation three to four weeks out with the date, the hours (a full day), the location or the remote joining details, and what each person is expected to bring. Ask for a positive confirmation, not silence, and chase the people who have not replied a week before. An exercise half its invitees forgot is a demonstration for the few who came.
Assign and communicate the framework roles in advance. Each participant is credentialed against a NIST NICE Work Role and an EU ECSF role profile, and the role is required, not optional: no role, no certificate. Agree each person's role with them before the day, so the Team step on the day is a confirmation and not a negotiation, and so nobody is credentialed against a role they did not know they held. Record the intended roles in the invitation.
Decide remote or in person, and commit to one. Each has its own preparation:
- *In person:* book a room that seats everyone with power at every seat, a
screen the coordinator can share, and a network the analyst tools can run on. Confirm the room a week ahead.
- *Remote:* choose the conferencing tool, send the link with the invitation,
and run a five-minute connection test with each participant the week before, not on the day.
Align the hardware, software and access, for every participant. This is the single most abandoned-halfway cause, so treat it as a checklist to clear before the day, not a hope:
- Hardware: each participant on a machine that can run the analyst tools,
with enough memory for a local container stack if they are hosting their own.
- Software: install Maltego and open it once online ahead of time (the
client requires a registered account sign-in, with MFA where set, and may update itself on first launch), and reach a MISP instance ahead of time, using the deployment guides this exercise produces (the Deploy Maltego and Deploy MISP steps). Standing up a MISP instance for the first time takes longer than an exercise slot allows, so it is done in the week before.
- Internet access and the data boundary: decide whether the day runs online
or air gapped. If any model or tool must reach the internet, clear it with whoever owns the network well ahead. If it runs air gapped, pre-stage the model and the container images with a network, then disconnect, and test that the tools still open offline. Nothing about your platform leaves the building unless someone decides per command that it may.
The day before
Scope the package and pre-load the exercise, so the morning is not spent waiting on generation. Open the harness, scope the package, select the exercise, review it, and generate the analyst data and the deployment guides the evening before. Send participants the Maltego and MISP deployment guides so they arrive with the tools already installed.
Confirm the room or the links, and the decision authority's attendance. A last confirmation the day before catches the one person who forgot.
The day: an eight-hour schedule, in outline
A full working day, briefing to hotwash. Adjust to your group, but do not compress the reporting or the review out of it.
| Time | Block | | --- | --- | | 00:00 to 00:45 | Arrive, connect, brief the room. Confirm the team and roles in the harness. | | 00:45 to 02:30 | First response: detection and analysis on the generated intelligence and graph. | | 02:30 to 03:30 | The reporting clock: draft the twenty four hour early warning against the deadline. | | 03:30 to 04:15 | Break and reset. | | 04:15 to 06:00 | Containment and eradication, and the decision the authority must make. | | 06:00 to 07:00 | Recovery, and sharing intelligence back through the record. | | 07:00 to 08:00 | Hotwash, assemble the workforce and tooling packages, close the record. |
The Run tab lays this schedule out block by block on the day itself. The seven steps below are the build that happens before it, in the Exercise tab.
Phase 2, the Exercise tab: build the packages
Finish this phase at least 24 hours before the event, ending with the analyst data generated and imported into the tools. Nothing here should be left for the morning of.
The Exercise tab is a seven-step wizard, and the seven headings below are its seven steps, in its order and with its numbering. One step is in focus at a time; the progress bar at the top carries you between them.
Open the harness
python3 -m h3.cli ui --project ~/exercises/2026-firstThe window opens with a welcome that explains the seven steps and captures who is scoping this workforce development and tooling package, and their role: a NICE Work Role and an ECSF role profile, for their certification. Your name then prefills every decision, so you confirm rather than retype. Press Scope the Exercise.
Step 1. Select an exercise
Choose a prepopulated exercise from the catalog. It fills in the platform, the enumeration and the threat catalogue in one step, so you begin from a real, cited exercise rather than a blank page.
To build a new scenario instead, open the AI WorkBench tab: draft one with a local or hosted model, and the hardcoded METEORSTORM, Maltego and MISP guardrails decide whether it meets the documented requirement for the catalog. The model proposes; the guardrails dispose.
Step 2. Review the exercise
Read the Concept of Operations diagram, the platform decomposed environment to asset, each element naming its parent. Verify the enumeration and the threat catalogue: every element and every threat carries a source citation. Record the review; the reviewer's name is prefilled.
A catalog exercise is deterministic and cited, not written by a model on the day. This step verifies and records it; it does not modify it.
Step 3. Define the team
Add each participant and the role they hold, mapped to a NIST NICE Work Role and an EU ECSF role profile, chosen from the bundled, hash-verified releases. This roster is the deterministic input to the workforce development package: a later step reads it and cites each framework's statements per person.
Put a real name on every participant. A record that cannot say which person held which role is not evidence.
Step 4. Generate the analyst data
Run the Analyst data stage. It writes only the generators the scenario's scope calls for: a Maltego relationship graph and MISP threat intelligence, both synthetic and derived from the one enumeration. Telemetry is written only when the scope reaches spacecraft signals; a SATCOM IT-intrusion advisory does not call for it, so none is generated, and nothing is produced because a stage happens to exist.
python3 -m h3.cli maltego --project ~/exercises/2026-firstStep 5. Deploy Maltego
The tooling package is not a folder of stub containers that emulate nothing. It is the guidance a recipient acts on: how to stand up the real analyst tools and load the data this exercise generated. There is one deployment step per generated data set, and this is the first of two.
This step writes deploy/maltego/DEPLOY.md: set up the METEORSTORM transform once, build the graph from the packaged scenarios.yaml, and open it in Maltego Community Edition. Importing the CSVs through the Graph Import Wizard stays in the guide as the fallback, with every wizard step named. The whole procedure was validated live on a Kali analyst workstation.
Send this guide to participants before the day, so the tool is installed and signed into in advance.
What the Maltego setup looks like
The Maltego half is a one-time setup and then a graph you open. Run ./setup.sh in the MalTegoForSpace repository, import meteorstorm.mtz and meteorstorm-transforms.mtz once through Import Config, then build this exercise's graph from the packaged scenarios.yaml and open it. A public release of that repository is planned; until it is published, your exercise organizer provides it.
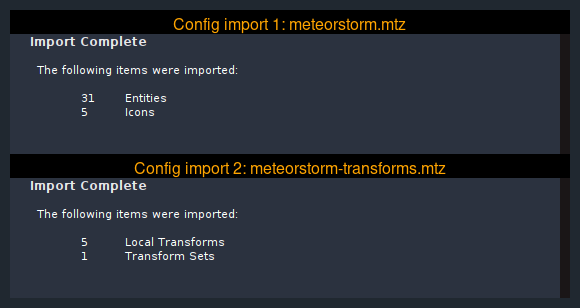
Check the two Import Complete pages. The wizard reports totals only, with no breakdown of what was new or replaced, so these numbers are how you know the import took. The ontology brings in 31 entities and 5 icons; the transforms bundle brings in 5 local transforms and 1 transform set. Numbers below those mean a file did not import fully.
The result is the whole decomposition, laid out, every node carrying its ETEN, with the METEORSTORM transforms answering on right-click. The status bar states the counts, and they are the counts the package's links.csv lists: a segment fed by two environments shows both edges.
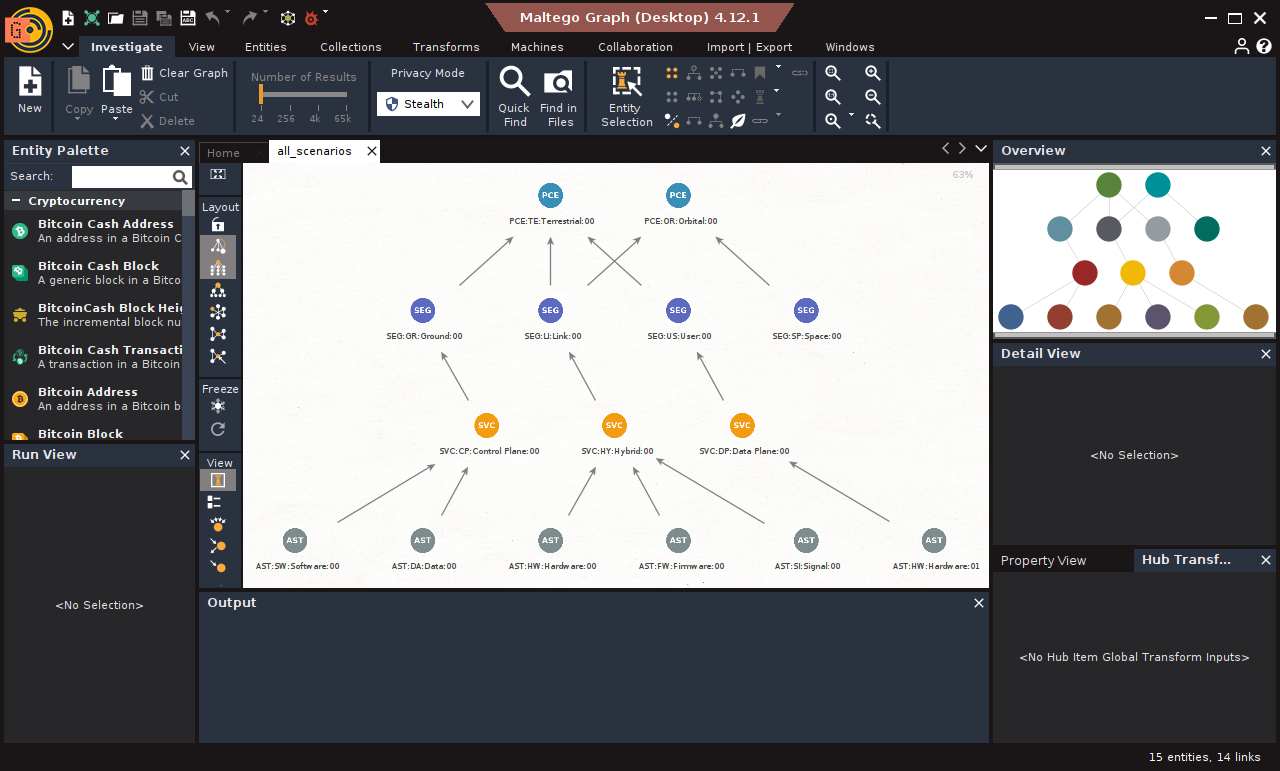
Run a transform to confirm the setup. Right-click any element and choose Show Parent, then the layer above it. Reach it through the Run Transforms search box, typing part of the name: the same transform also appears nested under several category rows, and the category arrows are fiddly. An element with two parents materializes both, which is the check worth doing, because it proves the transforms read the whole parent chain rather than the first entry.
Step 6. Deploy MISP
This step writes deploy/misp/DEPLOY.md: stand up the official MISP Docker stack and import events.json, which is MISP standard format. The guide names the exact import path, verified against a live instance, and the purge afterwards by marker tag is exact, also proven live.
Standing up a MISP instance for the first time takes longer than an exercise slot allows, so send this guide out in the week before, not on the day.
What the MISP setup looks like
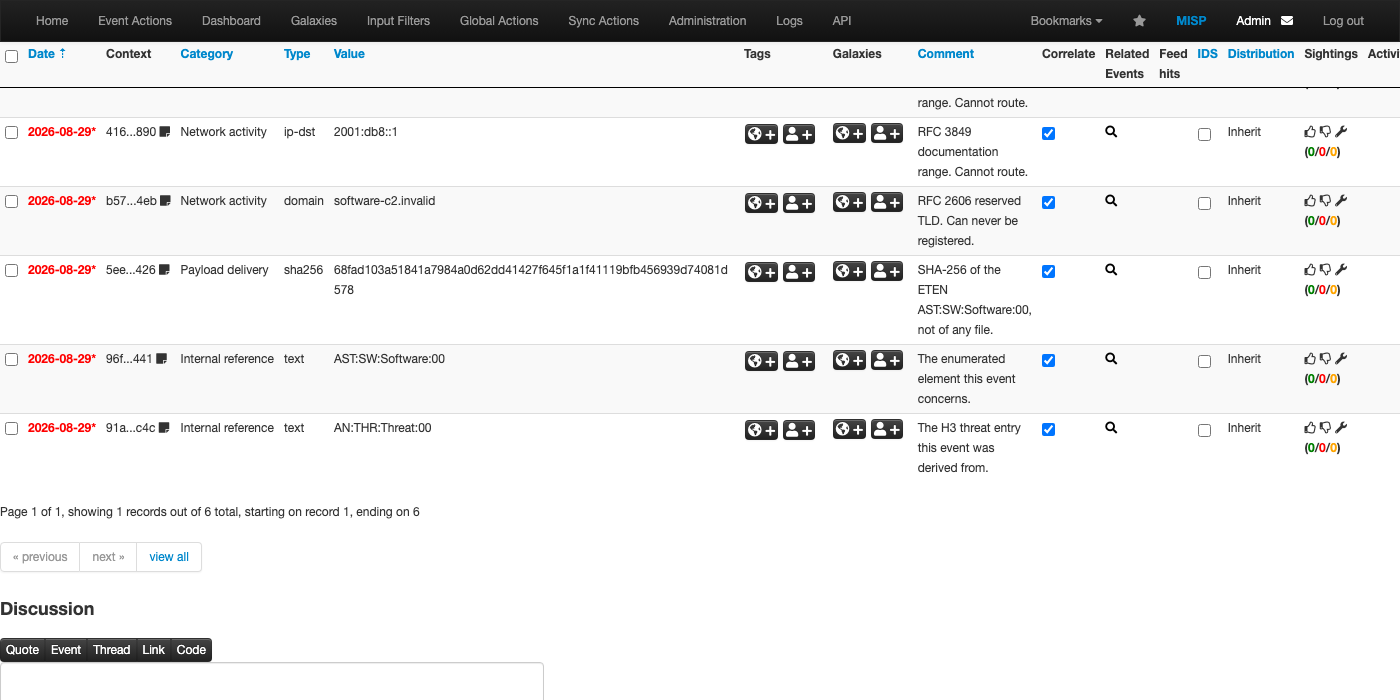
Every screen below was captured on a real MISP 2.5.44 instance loading this exercise's own events.json. If your screens differ from these, trust your screens and tell us: this sequence is the one the deployment guide describes.
1. Sign in. After docker compose up -d and a few minutes of first boot, open the URL you set as BASE_URL and sign in with the admin account from your .env.

2. Start from an empty instance. Event Actions, then List Events. A fresh training instance holds nothing, which is the state you want before loading an exercise.
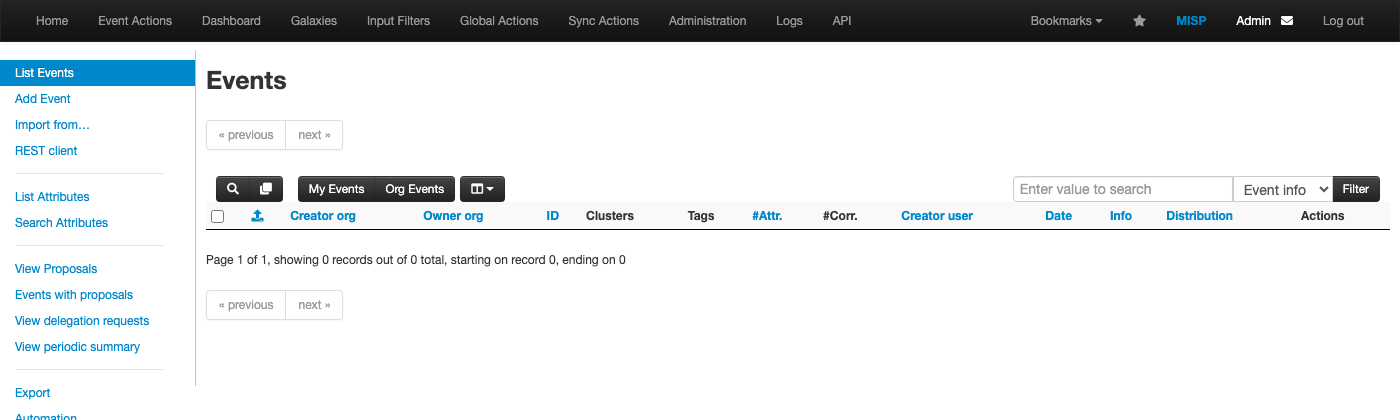
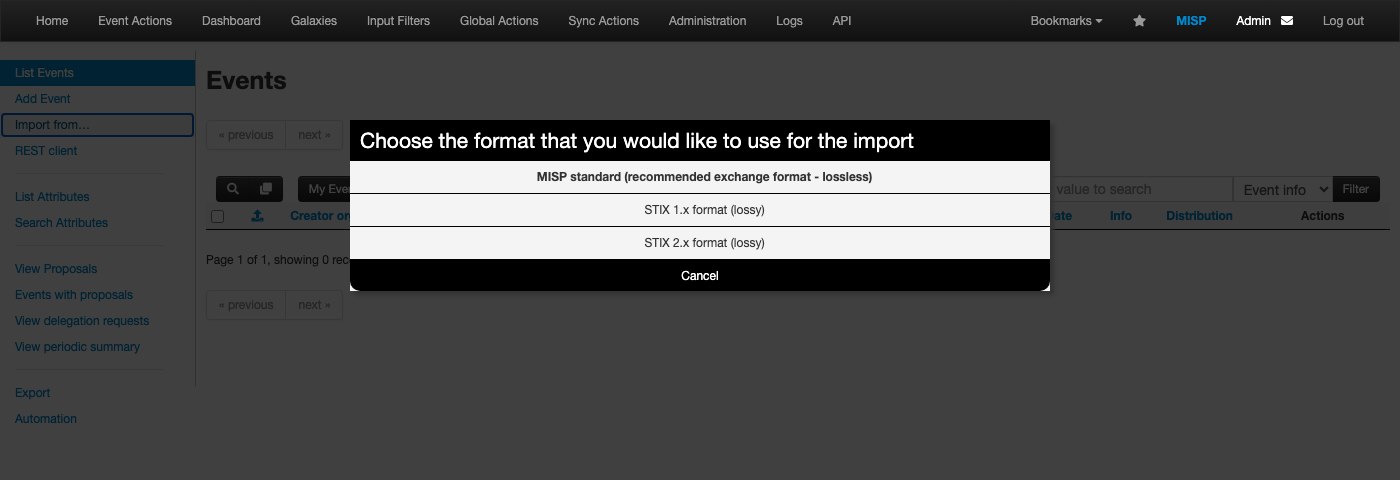
3. Choose the import format. Import from... in the left menu opens the format choice. Pick MISP standard (recommended exchange format - lossless). The file H3 generates is MISP standard format, so the other two options are wrong for it.
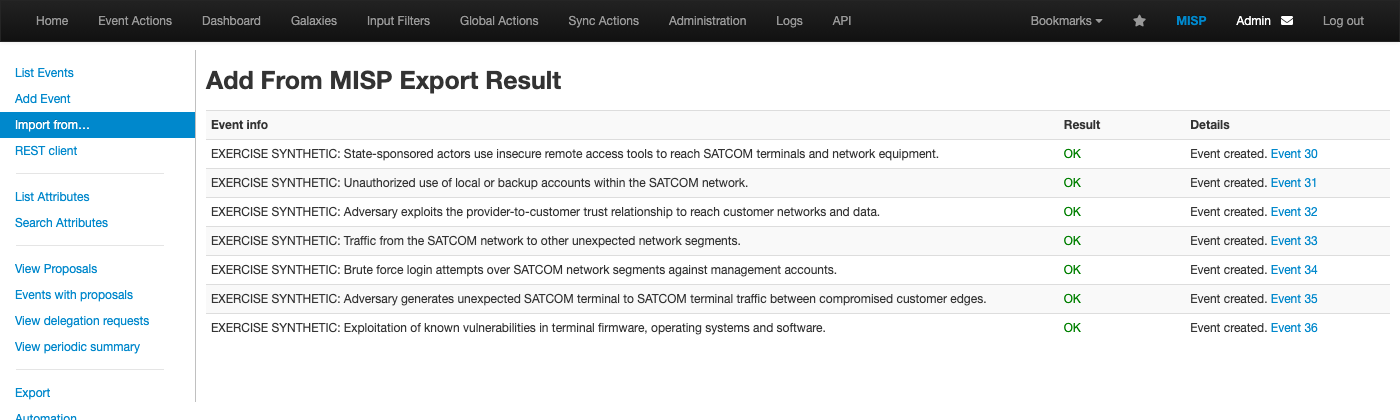
4. Read the result page. One row per event, each saying what happened. Every row should read OK. Importing the same file twice reports "Event with this UUID already exists" instead of creating duplicates, because the UUIDs are derived rather than random.
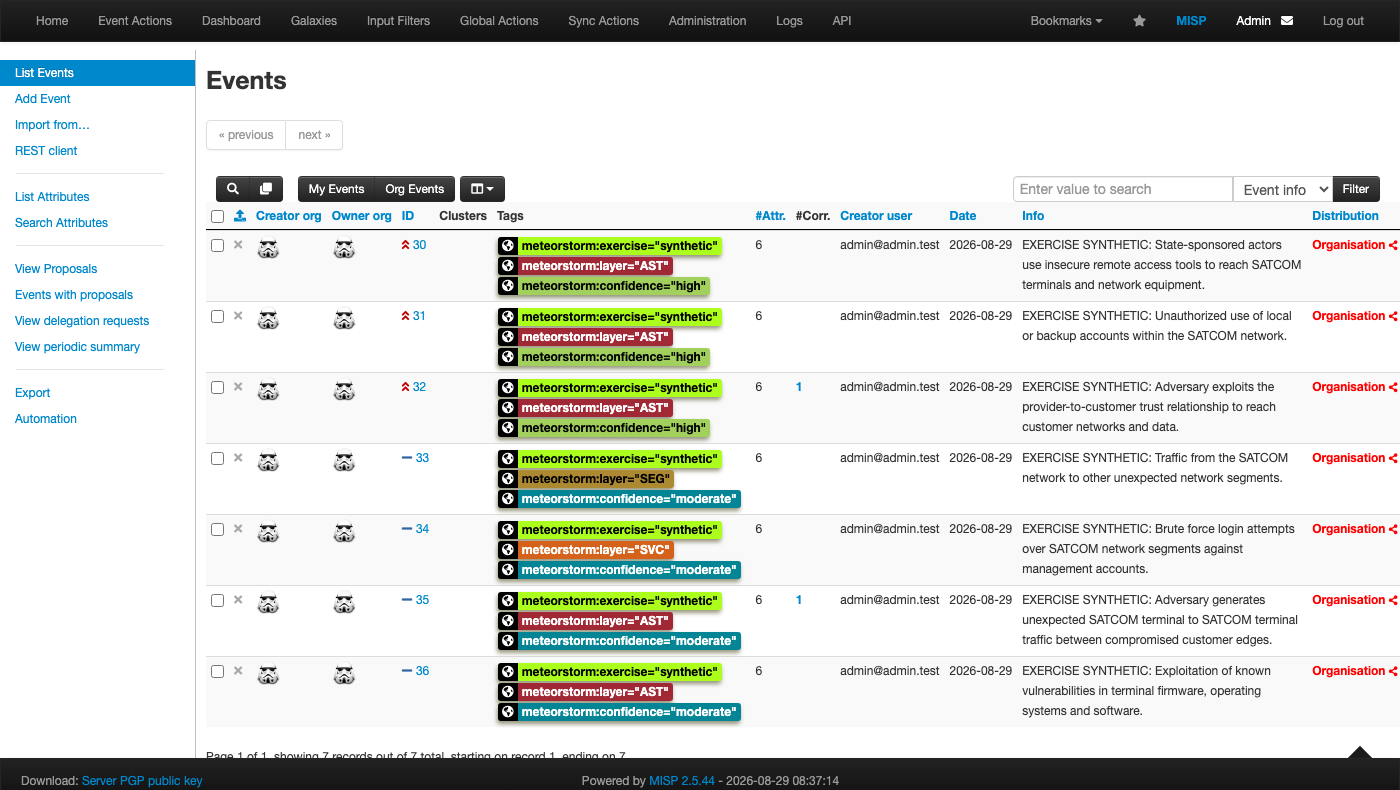
5. Check the tags. The event list shows every event carrying the marker tag meteorstorm:exercise="synthetic", its METEORSTORM layer tag, and its confidence tag. The marker is what makes the purge exact afterwards.
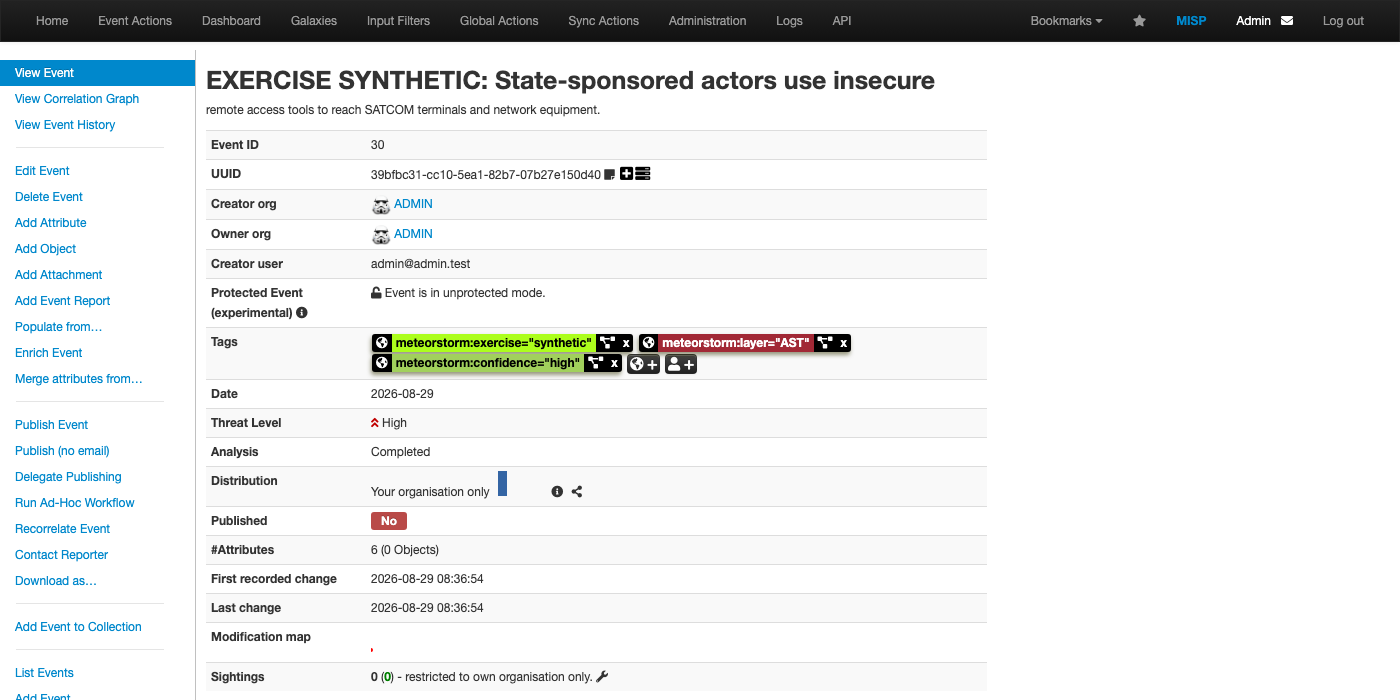
6. Open one event. The header carries the tags, the threat level and the attribute count. Distribution reads "Your organisation only" and Published reads No, which is what you want for exercise material: it stays on the training instance.
7. Read the attributes. This is what an analyst works with. Each fabricated indicator carries a comment naming the standard that makes it non-routable, and the last two rows are the internal references that tie the event back to the exercise: the ETEN of the element it concerns, and the H3 threat entry it came from. Nothing is marked IDS, so none of it can drive an alert in a detection stack.
Step 7. Assemble the package
python3 -m h3.cli package assemble --project ~/exercises/2026-first \
  --decided-by "Your Name"
python3 -m h3.cli package verify --project ~/exercises/2026-first
assemble refuses without a name. A package is a handover, and a handover nobody signed is the thing this product exists to refuse. verify re-hashes every file against the manifest and is what makes the handover checkable by somebody who was not in the room. In the window, the Package step does both and lists every file with its hash for download.
Phase 3, the Run tab: the day
The Run tab is the day itself. It validates every seat before you start, lays the eight-hour schedule out block by block against the Directive's deadlines, and captures an observation at each step. Those observations are what compile into the after-action report back on the Process tab, so capture as you go rather than reconstructing it afterwards.
Validate every seat first
Before the first block, the Run tab walks a per-participant check: the machine runs Maltego signed in with the METEORSTORM transform set imported and the exercise graph open, it reaches the MISP instance with the events imported, the network or air-gap decision is tested, and the participant knows their NICE and ECSF role for the day. A seat that fails this check is a participant who spends the first block installing software instead of exercising.
Brief the room
Give the analysts the graph and the intelligence, opened in the tools they installed from the deployment guides. Tell everyone plainly that all of the data is synthetic and resolves to nothing in the world. Say it out loud; do not rely on people reading a README.
Keep the answer key. It is generated separately for exactly this reason, and an exercise whose participants can read the answers is a demonstration.
Run against the clock
Run the scenario with the deadlines the Directive sets, not with the deadlines that are convenient. The twenty four hour early warning, the seventy two hour notification and the one month final report are the obligation. An exercise that rehearses a technical response and skips the reporting has tested half of it.
Exercise the decision, not only the detection. The interesting failure is almost never that nobody noticed; it is that the person who could authorise a containment action with operational consequence could not be found.
The workforce development package
The team roster is the second package, and the one a person walks away with. It maps each participant to a NIST NICE Work Role and an EU ECSF role profile, and both frameworks are now bundled in H3 and hash verified, so the mapping is real rather than deferred:
h3-niceserves NICE Framework Components v2.2.0 (NIST SP 800-181 Rev.
1): 5 categories, 42 Work Roles, and their Task, Knowledge and Skill statements. The vocabulary is TKS, not KSAT: Ability statements were retired and folded into Skills, so anyone still writing KSAT is on a superseded release.
h3-ecsfserves ECSF v1: the twelve ENISA role profiles with their
missions, tasks, skills, knowledge and e-competences. ECSF defines no proficiency levels for its skills, knowledge or tasks; the e-competence levels are the e-CF (EN 16234-1) levels.
A credential step reads the roster and cites each framework's statements by identifier, with the exercise record as the evidence. The assessor decides; H3 assembles the evidence and does not score it. Task coverage, which tasks the exercise actually exercised, refuses until the exercise records which task each action exercised, and says so rather than inventing a number. A credential claiming coverage it cannot evidence is the claim an employer will eventually test.
The AI WorkBench, which is optional
You can run every exercise in this guide without ever opening this tab, and without a model installed at all. Read this section when you want it, and skip it otherwise.
In plain terms
Twelve published security frameworks ship inside H3: ATT&CK, CAPEC, D3FEND, EMB3D, ATLAS, FiGHT, SPARTA, NIST SP 800-53, the CSA matrices, NICE and ECSF. Reading them is slow, and knowing which one answers a given question is its own skill.
The AI WorkBench lets you ask in plain English. You type a question, a model you choose works out which framework can answer it, H3 looks the answer up in that framework, and the model replies using only what it found, naming the release it read. The board shows you which framework it reached, so you can see where an answer came from rather than taking it on trust.
It is an experiment, and it is honest about that. We are working out the best way to build AI expert agents over frameworks, over infrastructure as code, and over the other Hackathon as a Service solutions. This tab is the bench that work happens on. Treat what it tells you as a starting point you verify, never as an authority, and note that the exercise lifecycle is deliberately built so that nothing depends on it.
The technical section, and what has been validated
This part is for the reader who has to defend the design.
What the loop actually is. The model is given a catalog of agents and their read-only tools. It picks one and proposes a call. H3 executes that call over the same Model Context Protocol transport an external client would use, so the chat gets no privileged path into the product. The result returns to the model, and the model composes an answer over it. The routing intelligence is the model itself; there is no separate coordinator agent, and saying otherwise would be a fiction about our own architecture.
What retrieval actually is, and what it is not. Retrieval is a text match over structured records, not a vector search. Your terms are matched against the framework's own records, and each match comes back with the release it belongs to and the SHA-256 of the file it was read from. There are no embeddings and no vector database. Two consequences follow, and both are worth knowing before you rely on it:
- A paraphrase the framework does not use in its own words can miss. Asking
for "at rest protection" may not find text that says "encryption". Asking in the framework's vocabulary works better.
- In exchange you get determinism and provenance. The same question returns
the same passages, permanently, each traceable to a hash-verified release. An exercise that must run twice and produce the same evidence needs that more than it needs paraphrase tolerance.
The full architecture, including where vector and graph retrieval fit and what it would take to add them without losing either property, is in docs/AGENTIC-RETRIEVAL.md in the H3 repository.
The boundary, which is enforced rather than promised. The chat is offered only retrieval agents and the graph queries, and only their SAFE tools. It cannot regenerate your exercise, write a file, or reach anything that changes state, because those tools are never in the catalog it sees. A local model keeps the conversation on this machine. A hosted one crosses the same egress boundary as every other model call in H3: it happens over your name, per command, and it is logged.
What has been validated. The loop is driven end to end by the test suite with a scripted adapter, so the routing, the tool execution and the grounding are exercised on every build rather than by hand. The render gate drives the tab in a real browser and asserts the agent board and the model picker render. The read-only guarantee is enforced by the catalog itself, which is derived from the agent definitions, so a new agent cannot accidentally expose a state-changing tool to the chat.
What has not been validated, stated plainly because this is an experiment: answer quality across the twelve frameworks has not been measured systematically, and there is no benchmark behind it. Retrieval recall is limited by the text match described above. Judge its answers, do not assume them.
Clean up
Purge the exercise intelligence from any MISP instance you loaded it into, using its marker tag. Every event this exercise created carries one, which is what makes the purge exact rather than approximate.
Tear down the deployed tooling, the MISP instance especially, or snapshot it if you intend to run the same exercise with a different group.
Keep the record and the assembled packages. Those are the evidence, and they are small.
Afterwards
Share what is shareable. NIS2 encourages voluntary exchange of cyber threat information, and exercise findings are among the most useful and least sensitive things you can contribute to a sector ISAC. Because the record is written in a published taxonomy, a peer can read it without translation.
Run it again. The first exercise runs with trainers in the room. The ones after that are yours, on your schedule, at whatever classification level your work demands. That is the whole point: the capability stays with your team, and the software is yours to keep.
When something goes wrong
The model proposes nonsense. Check whether the validators are catching it. If they are, the loop is working and the model is simply weak; try a larger one or accept more rejections. If they are not, that is a defect and we want to hear about it.
A rejected proposal looks correct to you. Read the validator code. Most often the element names a parent that was not enumerated, which means the enumeration has a gap rather than the proposal having an error.
MISP will not come up offline. Its container images were not pre-staged. Pull them with a network, then disconnect again.
Something reached out that should not have. Stop and tell us. The data boundary is the claim the whole product rests on, and a hole in it is the most serious defect this software can have.
Next
That is the sequence. There is no guide 4, because the exercises after this one are yours to run without us, which is the whole point of train-the-trainer.
Two places to go from here. Guide 2, Platform validation is worth re-running after any upgrade, not just once at install. And when you want to change what H3 produces rather than how you run it, the specification is in MINIMUM-OUTPUT.md (MINIMUM-OUTPUT.md in the H3 repository) and the method itself is in PROCESS.md (PROCESS.md in the H3 repository).
This page and its PDF are both generated from
docs/guides/03-operations.md in the H3 repository. The markdown is the
source; edit that, not this.